Wednesday, 24 April 2013

DotNetToscana - Goals, Principles and Values

I recently wrote a post about the incredible growth of DotNetToscana and I am really proud of this.

Since the last post we already had three new members:

We are now 14 people and we are all really good friends.


I would like to share some of the slides taken from the last event Javascript Full Immersion about the goals, principles and values of our community.


Saturday, 16 March 2013

The Definitive Guide to Learn JetBrains ReSharper Shortcuts in Visual Studio

JetBrain ReSharper is an amazing tool that enhance the productivity of writing code and brings it at a completely new level.

I am working with ReSharper from a while now and I realized that I was not taking full advantage of it. One of the reason is because I didn't know all the possible shortcuts available and I often relied on the mouse to accomplish a task.

The typical excuse is (from the The Productive Programmer Book):
I know there's a keyboard shortcut that does this, but I'm in a hurry, so I'll use the mouse instead and look up that keyboard shortcut late. 
The fact is that:
Later never comes.
OK, good. I don't want to be lazy. It's time to learn it.

What do you do?

You go to the ReSharper Official Website and you download the ReSharper 7 Keymap. You spend some time experimenting and you decide to print the Keymap and keep it close to your desk. You try to use the keymap as much as you can, but after a while you are already completely immersed in your work that you forget to look at it and you continue to do the same as before. Maybe you just learnt only a  single shortcut.

Why this happens?

Because learning shortcuts in that way and all of them together is extremely boring. Even if you are completely aware that learning them would make you a more productive developer you don't do that because it is so boring.

Why then not learning the shortcuts while you work without upfront preparation?

It doesn't work! You know what will be the excuse at the end. In addition, you might not even know that in some situation there is a ReSharper functionality available to help you in that particular context.

I think that the way to go is the middle and the process can be split in two steps:
  1. Learn what are the ReSharper features and the most important shortcuts
  2. Learn new shortcuts while you work
OK, but what are the most important shortcuts?

This is finally the right question to ask!

Because learning shortcuts is extremely boring why not consider to learn first the shortcuts that gives you access to other shortcuts based on the current context? In that way, you could learn new shortcuts during your work. This, in some way, is similar to have a person close to you telling what the shortcut is.

You don't need to print a Keymap in that case!

You know how to see a contextual Keymap straight in the editor while you work that is much better!

OK, at this point let's see the 10 Most Important Shortcuts you need to learn.

1) Navigate To: ALT + `

This shortcut satisfy all your navigation needs based on where the caret is in the code editor.


2) Generate Code: ALT + INS

3) Refactor This: CTRL + SHIFT + R

This shortcut satisfy all your refactoring needs based on where the caret is in the code editor.

4) Go To Type: CTRL + T

This shortcut is fundamental to jump immediately to a specific type in your code base. In ReSharper 7 you also need to be able to jump to a specific symbol or file using two additional shortcuts. I am not reporting these shortcuts here because JetBrain announced that ReSharper 8 will add this ability using this single shortcut as a Go To Everything feature.

5) Quick Fix: ALT + ENTER

While you code, this shortcut provides you a context menu with the list of possible quick fixes.

6) Go To Next/Previous Member: ALT + Up/Down

These shortcut allows you to quickly move between members in a class.


7) Insert Live Template: CTRL + E, L

This shortcut allows you to insert a live template (included your custom templates).
8) Inspect This: CTRL + SHIFT + ALT + A

This is a shortcut to the code exploration features.

9) Run Unit Tests: CTRL + U, L

Runs all the unit tests in the solution.


10) Go Back
: CTRL + -

This is an interesting shortcut that I find very useful. When you navigate to a declaration or implementation after your exploration you often want to come back to the original location. This shortcut allows you to go back to the previous caret position. 

I can't work anymore without this shortcut.
Open ReSharper Menu: ALT + R

This shortcut is not actually a ReSharper shortcut but the simple Visual Studio Shortcut to the ReSharper Menu. All the previous shorcuts that I presented open the door to almost all the ReSharper features but not all of them. This is why it is important sometimes to visit the ReSharper Menu to check what are the others available shortcuts. This in some why represent your Keymap always available to you inside the editor. Keep it in mind.


Complete List

I hope that you found this post useful.

For convenience, this is the list of all the most important shortcuts together:
  1. Navigate To: ALT + `
  2. Generate Code: ALT + INS
  3. Refactor This: CTRL + SHIFT + R
  4. Go To Type: CTRL + T
  5. Quick Fix: ALT + ENTER
  6. Go To Next/Previous Member: ALT + Up/Down
  7. Insert Live Template: CTRL + E, L
  8. Inspect This: CTRL + SHIFT + ALT + A
  9. Run Unit Tests: CTRL + U, L
  10. Go Back: CTRL + -
  11. Open ReSharper Menu: ALT + R
OK, now is time to work and be productive ;)

Sunday, 10 February 2013

The Iterator Pattern in .NET

The Iterator Pattern provides a way to access the elements of an aggregate object (collection) sequentially without exposing its underling representation.

The ultimate goal of the pattern is to decouple the client from the implementation of the collection that always remains well encapsulated.

This is definitely my favourite pattern in particular for how it is supported by C#.
It's easy, amazing and extremely powerful.

The Client

In the .NET framework the pattern is fully supported by all the collections in the Base Class Library and the C# language provides the foreach keyword to iterate a collection in an extremely simple way. Every .NET developer knows it.


What is the beauty of the pattern?

The beauty is that the client does not need to know nothing about the internals of the collection in order to iterate through its elements. Replacing the List with an HashSet does not require to change the foreach loop in any way.


How does it works?

The foreach loop works only on collections that implement the interface IEnumerable or the generic version IEnumerable<T>.

All the .NET framework collections implement that interfaces included List and HashSet.


The IEnumerable interface contains a factory method that should return an implementation of the interface IEnumerator or the generic IEnumerator<T>.

An enumerator class is responsible to enumerate the collection. It is a read-only, forward-only cursor over a collection.

The property Current returns the current element in the collection; the method MoveNext() advances the enumerator to the next element of the collection; the method Reset() sets the enumerator to its initial position, which is before the first element in the collection.


Everything becomes clear when you see how the C# compiler translates the foreach loop using directly the enumerator. This is the magic!


Using a .NET disassembler like ILSpy or dotPeek however we can't see the translated version in C#. In order to have a confirmation that what I said is actually true we have to look directly at the generated IL.


It is easy to see that the compiler actually does something more. It wraps the enumeration in a try/finally construct in order to properly Dispose the enumerator. This is important because IEnumerator implements IDisposable.

Finally, this is the correct C# version of foreach.

The foreach statement simply provides a very elegant way to generically enumerate a collection.

How to Implement Enumerable Collections

OK, brilliant,we now know how to enumerate any collection using the foreach keyword and in particular how this is actually done under the cover.

It's time to create a custom collection. For example, a collection that is able to store any integer between 0 and N using internally a frequency array. This is actually pretty simple to do.

However, the following code does not compile. The compiler is not able to initialize and enumerate the collection.


We obviously need to implement the IEnumerable interface


A typical choice is to use a nested type to implement the enumerator. This allows to access the internal of the collection to accomplish the job. Note that the enumerator is intrinsically coupled to the collection. It turns out that implementing an enumerator it is not so easy as it may seems initially.


The complexity of implementing the enumerator arises because it is required to maintain the current state of the iteration between subsequent calls to MoveNext. In the example the variables pos and count are required in order to maintain the state of the iteration.

Can you understand the code inside MoveNext?

Yes, I know. You may understand it but it is definitely not intuitive.

Fortunately, the C# compiler comes in help here with the keyword yield that implements the concept of coroutines in .NET.

You can implement all in the following beautiful way without the need to manually implement the enumerator yourself.


This looks like really magical!

But we are curious, let's deep dive and see the code generated by the compiler.


OK, the compiler create an instance of a compiler generated enumerator class passing through a property a reference to the collection. The compiler generated enumerator is also a nested collection.


The compiler generates a state machine under the cover. It is really impressive what it does but all this complexity is hidden to the developer thank to the yield keyword.

The Iterator Pattern and LINQ to Objects

Everything we discussed so far has always been available since C# 2.0.

C# 3.0 added LINQ to the language expanding in a significant way the potential of the language. This is without any doubts the main reason why I love C#.

The power of LINQ to Objects in particular is related to the fact that iterators are highly composable.

Consider the code that print the double of the even numbers from the collection using LINQ to Objects.


How the enumeration process works in this case?

The first call to Where generate a enumerable object that wraps the source collection using the decorator pattern. The object itself however is also the enumerator of itself. The main logic is inside the MoveNext method that iterates the source collection and then apply the filter.


The same is for the Select method where the source collection in this case will be the result returned by the Where method.


The execution at run-time will be a chain of enumerations that is simply described by the following sequence diagram.


Conclusion


The iterator pattern these days is a fundamental pattern and it is fully integrated in the modern programming languages and libraries. In particular in C# you can leverage the pattern using the foreach statement in the client code, and implementing IEnumerable and IEnumerator when you create new collections. Don't forget the incredible support that the yield keyword can provide you when you implement your custom collections.


It's important to notice that the iterator pattern is a good example of the Single Responsibility Principle: "A class should have only on reason to change". The 
Enumerator class is a class with the single responsibility to traverse a collection.

The main benefit of the pattern is decoupling the clients from the internals of the collections. This allows to change the collection without affecting clients.

Wednesday, 6 February 2013

The Rapid Growth of DotNetToscana

I am absolutely impressed by the rapid growth of the .NET community in Tuscany that I contributed to found in 2008. At the time, we were three passionate people with the dream to create a community of developers around the Microsoft .NET technologies with the ultimate goals of learning together by sharing knowledge and experience.

This quick interview has been taken by the Microsoft Developer Evangelist, Pietro Brambati in Florence the day we launched the community at the Microsoft Days 2008 Conference.


In 2013 we are now the Official Microsoft Community in Tuscany part of the new Microsoft Technical Communities program.

I would like to thank you all the members of the staff for the great technical skills and impressive enthusiasm they bring everyday to the community. In addition, all of them, are people I can call "friends" and this is an additional value of doing community.

This is the full list of people that are currently part of the staff:

We also have an official polo shirt...


...and many many sponsors:


This is the list of events we delivered in 2012. I would say awesome!


In conclusion, I would like to thanks all the people that attended our events. Without them DotNetToscana couldn't be what it is now. Thank you!

More info on the official website: http://www.dotnettoscana.org

We often write in English. You can find us in all the major social networks:


I wish all the best for for the community and surely I will continue to give my little contribution to its future success.

Sunday, 3 February 2013

Conditional Attribute in C#

Conditional directives in C# are extremely useful to include or exclude regions of code from compilation. This allows you to target different platforms.


Consider a class Logger with a Log method. If you want to log a message only in debug mode you could do something like this.


This code is ugly isn't it?

This is an another way to do it but it is not exactly what we would like. The code works but there are lots of useless function calls that reduce the performance at run time.

This is the situation when the Conditional attribute is useful. The following code is equivalent to the first example but much more readable.

This attribute is in fact extensively used in the classes Debug and Trace.

The next time you use conditional directives, keep in mind the Conditional attribute.

Unsafe and Fixed keywords in C#

C# allows you to manage memory directly when needed mainly for performance reasons.

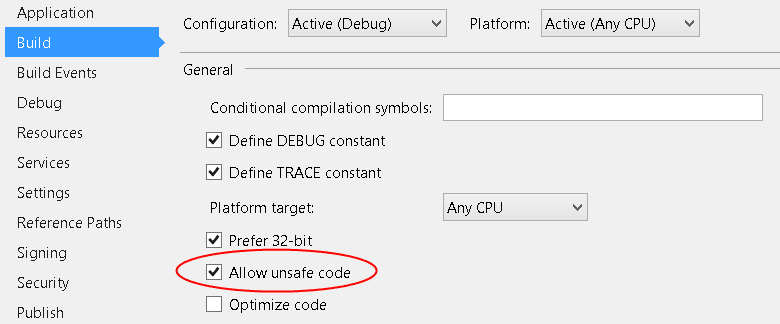
In order to do so you need to compile your code using the /unsafe switch. This is required because unsafe code cannot be verified by the CLR.

In Visual Studio you can enable this in the Properties panel.


In this post I would like to run a simple experiment to measure the difference in performance when you run a very simple matrix filter: computes the square of each number in the matrix.

The safe method:
The unsafe method:
The unsafe keyword denote that the method contains unsafe code. The keyword fixed is required to pin a managed object (matrix in this case) in order to avoid that the garbage collector move the object while we perform the operation.

Inside an unsafe block it is possible to use pointers in C#. Surprised?

This is the code that compares the performance of the two versions:


The output is the following:

Safe time: 0.4410526
Unsafe time: 0.1252171
Unsafe is 3.52230326369162 times faster


There is a lot to say about unsafe in C# but I don't want to go deep in the subject because the use of pointers is almost never required and it should be avoided if possible.

The important lessons from this post are:

  • C# allows to use pointers and manage the memory directly if you need it
  • Unsafe code in C# can improve performance
  • Always measure performances to justify the use of unsafe code


Thursday, 31 January 2013

Software Requirements - Part 5

This is the fifth and the last part of the following book summary.


Previous posts:


Software Requirements Management

Requirements management includes all activities that maintain the integrity, accuracy, and currency of the requirements agreement as the project progresses.

No one approach is universally correct because projects differ in their flexibility or features, staff, budget, schedule and quality. Base your choice on the priorities that the key stakeholders establish during project planning.

The requirements baseline is the set of functional and nonfunctional requirements that the development team has committed to implement in a specific release. The base-lined SRS document should contain only those requirements that are planned for a specific release. Requirements baselines are dynamic. The set of requirements planned for a specific release will change as new requirements are added and existing ones are deleted or deferred to a later release.

Your organization should define the activities that project teams are expected to perform to manage their requirements. Documenting these activities and training practitioners in their effective application enables the members of the organization to perform them consistently and effectively. Your process descriptions should also identify the team role that's responsible for performing each task. The project's requirements analyst typically has the lead responsibility for requirements management.

Every team member must be able to access the current version of the requirements, and changes must be clearly documented and communicated to everyone affected. Consider appending a version number to each individual requirement label, which you can increment whenever the requirement is modified.

A more sophisticated technique stores the requirement documents in a version control tool, such as those used for controlling source code though check-in and check-out procedures.

The most robust approach to version control is to store the requirements in the database of a commercial requirements management tool.

You can find detailed feature comparisons of these and many other tools in International Council on System Engineering web site.

The main benefits of a requirements management tool are:
  • Manage versions and changes
  • Store requirements attributes
  • Facilitate impact analysis
  • Track requirements status
  • Control access
  • Communicate with stakeholders
  • Reuse requirements

These products show a trend toward increasing integration with other tools used in application development.

Think of each requirement as an object with properties that distinguish it from other requirement. A rich set of attributes is especially important on large, complex projects but selecting too many requirements attributes can overwhelm a team such that they never supply all attribute values for all requirements and don't use the attribute information effectively.

Software developers are sometimes overly optimistic when they report how much of a task is complete. They often give themselves credit for activities they've started but haven't entirely finished. Track status against the expectation of what "complete" means for this product iteration.

Measuring actual development and project management effort requires a culture change, and the individual discipline to record daily work activities. Effort tracking isn't as time-consuming as people fear. The team will gain valuable insights from knowing how it has actually devoted its effort to various project tasks. Note that work effort is not the same as elapsed calendar time.

What about Requirement Changes?

Most developers have encountered an apparently simple change that turned out to be far more complicated than expected. Such uncontrolled change is a common source of project chaos, schedule slips and quality problems.

An organization that is serious about managing its software projects must ensure that:
  • Proposed requirements changes are carefully evaluated before being committed to.
  • The appropriate individuals make informed business decisions about requested changes.
  • Approved changes are communicated to all affected participants.
  • The project incorporates requirements changes in a consistent fashion.

The closer you get to the release date, the more you should resist changing that release because the consequences of making changes become more severe.

Using short development cycles to release a system incrementally provides frequent opportunities for adjustments when requirements are highly uncertain or rapidly changing.

The Change Control Process

The change control board has been identified as a best practice for software development. The CCB is the body of people, be it one individual or a diverse group, who decides which proposed requirement changes and newly suggested features to accept for inclusion in the product. A higher-level CCB has authority to approve changes that have a greater impact on the project.

Policies are meaningful only if they are realistic, add value and are enforced.

Useful change-control policy:
  • All requirements changes shall follow the process
  • No design or implementation work other than feasibility exploration shall be performed on unapproved changes.
  • The contents of the change database shall be visible to all project stakeholders
  • Impact analysis shall be performed for every change.
  • The rationale behind every approval or rejection of a change request shall be recorded

Many teams use commercial problem or issue-tracking tools to collect, store, and manager requirements changes. Remember however that a tool is not a substitute for a process.

The CCB Chair will typically ask a knowledgeable developer to perform the impact analysis for a specific change proposal.

Impact analysis has three aspects:
  • Understand the possible implications of making the change.
  • Identify all the files, models, and documents that might have to be modified if the team incorporates the requested change.
  • Identify the tasks required to implement the change, and estimate the effort needed to complete those tasks

Skipping impact analysis doesn't change the size of the task. It just turns the size into a surprise. Software surprises are rarely good news.

It is useful to create a checklist to help you in the process. The book contains lot of examples.

Many estimation problems arise because the estimator doesn't think of all the work required to complete an activity. For substantial changes, use a small team - not just one developer - to do the analysis and effort estimation to avoid overlooking important tasks.

To improve your ability to estimate the impacts of future changes, compare the actual effort needed to implement each change with the estimated effort. Understand the reasons for any differences, and modify the impact estimation checklists and worksheet accordingly.

Requirements Tracing

It's hard to find all the system components that might be affected by a requirement modification.

Traceability links can help you build a more complete picture of how the pieces of your system fit together. On many projects you can gain 80% of the desired traceability benefits for perhaps 20% of the potential effort.

Defining traceability links is not much work if you collect the information as development proceeds but it's tedious and expensive to do on a completed system.

Determine the roles and individuals who should supply each type of traceability information for your project. Educate the team about the concepts and importance of requirements tracing.

It's impossible to perform requirements tracing manually for any but very small applications. Requirements tracing however can't be fully automated because the knowledge of the links originates in the development team members' minds. However, once you've identified the links, tools can help you manage the vast quantity of traceability information.

If you're maintaining a legacy system, the odds are good that you don't have traceability data available, but there's no time like the present to begin accumulating this useful information.

Even if your products won't cause loss to life or limb if they fail, you should take requirements tracing seriously.

Don't define traceability links until the requirements stabilize. 

The Impact of Software Requirements

The path to improved performance is paved with false starts, resistance from those who are affected, and the frustration of having too little time to handle current tasks, let alone improvement programs.

Requirements lie at the heart of every well-run software project, supporting the other technical and management activities.

It is interesting to consider the relationship of requirements to other project process.


It's not surprising that the long-suffering people at the end of the requirements chain, such as technical writers and testers, are often enthusiastic supporters of improved requirements engineering practices.

If customer-support costs aren't linked to the development process, the development team might not be motivated to change how they work because they don't suffer the consequences of poor product quality.

Process changes don't always result in fabulous, immediate benefits for every individual involved. A better question - and one that any process improvement leader must be able to answer convincingly - is , "What's in it for us?" Every process change should offer the prospect of clear benefits to the project team, the development organization, the company, the customer, or the universe.

Conclusion

The single biggest threat to a software process improvement program is lack of management commitment. Professional software practitioners don't need permission from their managers to better themselves and their teams. However, a broad process improvement effort can succeed only if management is motivated to commit resources, set expectations, and hold team members accountable for their contributions to the change initiative.

Keep the following four principles of software process improvement in mind:
  • Process improvement should be evolutionary, continuous and cyclical.
  • People and organizations change only when they have an incentive to do so.
  • Process changes should be goal-oriented.
  • Treat your improvement activities as mini projects.

Even motivated and receptive teams have a limited capacity to absorb change
, so don't place too many new expectations on a project team at once. Write a roll-out plan that defines how you'll distribute the new methods and materials to the project team and provide sufficient training and assistance.

Accept the reality of the learning curve - that is, the productivity drop that takes place as practitioners take time to assimilate new ways of working. This is part of the investment your organization is making in process improvement. 

Software project managers must identify and control their project risks, beginning with requirements-related risks. Formal risk management planning is a key element of a successful large-scale project. Project managers can control requirements risks only through collaboration with customers or their representatives. Jointly documenting requirements risks and planning mitigation actions reinforces the customer-development partnership.

Nothing is more important to a software project's success than understanding what problems need to be solved. If you actively apply known good practices and rely on common sense, you can significantly improve how you handle your project's requirements, with all the advantages and benefits that brings.